Sunday, August 21, 2016

Google App Engine Continuous Integration with GitHub and CircleCI

In this blog post, I will share how to implement continuous integration with your GitHub repository for your Google App Engine application.

First of all, what is Continuous Integration (CI)? In a normal process of a development cycle, developers will go through several steps, especially for GitHub as stated in GitHub Flow:

Without CI yet:

That sounds reasonable, right? However, it can be more perfect. With CI, developers can define test cases and run it automatically before deploying to production server. Also, CI also helps streamline the whole deployment process by triggering it automatically after code merge, instead of deploying by humans.

With CI, you can do more as follows:

Continuous Integration service providers There are several service providers of Continuous Integration, such as CircleCI, Travis CI, etc. Some of them offers free package for open source projects. If you have an open source projects, it is worth a try.

In this blog post, the main focus is on CI with CircleCI.

CI for Google App Engine I have created this GitHub repository as an working example to demonstrate how to setup CI with Google App Engine from a GitHub repo. The detailed steps are listed in the GitHub repo. Fork it to have a try!

Here are some points to note:
  • You will need to create an CircleCI account by granting access for it to retrieve all of your repos. You may wish to create a separate GitHub account to manage your repos under different organizations.
  • The example only compiles a
    webapp2
    application in GAE. If your application needs more packages installed for a test, you will need to edit the content of file circle.yml (
    dependencies
    >
    pre
    )

CircleCI Badge for your GitHub repo You can add this in the README.md of your GitHub repo:
![](https://circleci.com/gh/<owner>/<repo>.png?&style=shield&circle-token=<YOUR TOKEN HERE>)

Find more about the badges in the CircleCI documentation.
Summary After reading this blog post, you should understand the basic idea of how to setup continuous integration for your GAE application with CircleCI and your GitHub repo.

The demo repo is a very simple application without any functionality. In reality, you may need to take care of your application by defining more complex test cases to ensure it works.

Tuesday, December 8, 2015

More details on Google App Engine os.environ attributes

We can use python
os
package in Google App Engine to obtain some useful information for the request. As mentioned, we can obtain user geolocation of a user. Actually, there is a lot more we can do with it.

A LIVE DEMO is available. The demo contains a full list of
os.environ
keys and their corresponding values. Some values are not publicly disclosed, but you can try it in your own application.

The values are accessed with
os.environ[key]
with
key
value available, such as
HTTP_USER_AGENT
and
REMOTE_ADDR
. However, some of the App Engine-specific keys such as
USER_EMAIL
and
HTTP_X_APPENGINE_COUNTRY
, only exist in the GAE environment.

The following section comes with the complete source code.


Monday, November 16, 2015

10 Essential Atom Packages for Sublime Text users

Atom is a Text Editor published by GitHub. If you are new to development, or would like to give another editor a try, Atom is a good choice for you.

The benefits of using Atom:
- It is free,
- Atom allows customization by installing packages/ themes,
- Atom is available on Windows, Mac and Linux,

I was used to Sublime Text for my development work. In order to make Atom my favourite one, I conducted a short research about some useful packages in Atom and somehow made it more similar to Sublime Text.

The followings are 10 essential Atom packages available at Atom Package List.
1. pigments Supports color highlighting.

https://atom.io/packages/pigments
2. color-picker Pick a color in the editor with a right-click.

https://atom.io/packages/color-picker
3. minimap While Sublime Text supports minimap by default, we need to manually install this package in Atom to have minimap.

https://atom.io/packages/minimap
4. highlight-selected This package helps to highlight repeated words. Use Ctrd+D to select the next occurance of the word.

https://atom.io/packages/highlight-selected
https://atom.io/packages/minimap-highlight-selected
5. markdown-preview-plus This package provides a real-time preview of markdown documents.

https://atom.io/packages/markdown-preview-plus
6. autoclose-html This package enables auto-closing html tags in HTML documents.

https://atom.io/packages/autoclose-html
7. file-icons Adds colourful file specific icons for improved visual grepping in Tree View, Fuzzy Finder and Tabs

https://atom.io/packages/file-icons
8. merge-conflicts Lets you resolve your git merge conflicts in Atom.

https://atom.io/packages/merge-conflicts
9. sublime-style-column-selection This package adds back one of my favourite functions in Sublime Text -- Column select. With this package, we can hold Alt key and mouse select columns of text.

https://atom.io/packages/sublime-style-column-selection
10. slush-poppies This is my favourite theme used in Sublime Text. Together with this theme I also changed my UI Theme settings to "One Light".

https://atom.io/packages/slush-poppies


What is your favourite Package in Atom? Leave me a comment below!

Wednesday, October 14, 2015

How to center a HTML Popup dialog with CSS

In order to create a CSS-only auto-centered dialog, a few steps have to be done.

The first step is to add CSS
position: fixed;
to the target element with its
top
and
left
attributes both equal to
50%
.

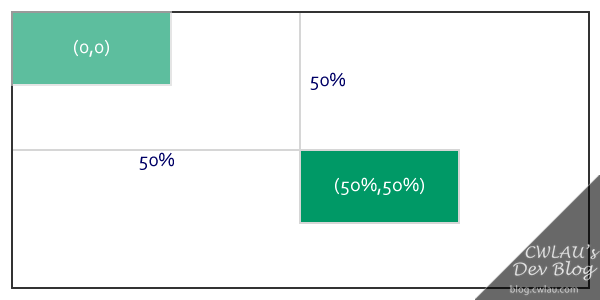
The target element now appears like this:


There is a problem -- setting left and top to 50% does not make it centered. Instead, the element shifted a bit from the center. To solve this, finish step 2 below.

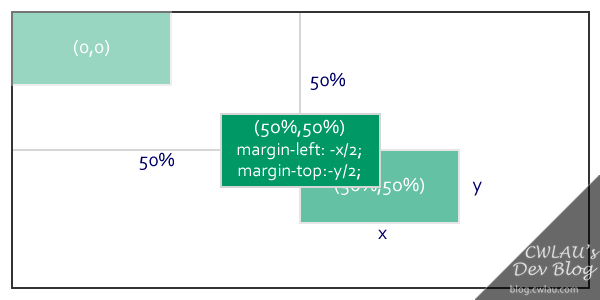
The next step is to adjust the extra pixels shifted from the center. We can set its
margin-left
and
margin-top
to -1*(its width) and -1*(its height) respectively. For instance, a
div
with width:400px should set
margin-left: -200px
. With this approach, the element shifts back to center and keeps centered all the time.


Note: The element width and height should be a fixed value.

The following code summarizes the demo:


Here is a Live Demo of this example.

Update 7 Nov 2015: Updated source code section to GitHub version

Wednesday, September 9, 2015

How to obtain user geolocation with Google App Engine

Sometimes it is good to provide a better user experience by obtaining geolocation of a user. In Google App Engine, we can use the information in python
os
package to achieve this:

Get the current city of a user:

Get the current country of a user (Will return a ISO 3166-1 alpha-2 country code):

Note: If App Engine fails to supply a city name or country code, the output will be the second argument supplied to the
os.environ.get()
function call.

Update 13 Oct 2015: Added a Demo link

Update 7 Nov 2015: Added complete source code.